


Digital Set Extension for Stopmotion

Updated: May 28
If you watch the behind-the-scenes content from big studios like Laika and Aardman, many of the sets have a bluescreen or greenscreen behind them. The sets are digitally extended in post. This has been a common technique on live-action films for decades, but there is very little information online about doing it with stop-motion. I'll try to walk you through the process so you can use it on your own projects.
In the music video In the Ground, I used set extensions in most of the shots. The ones with a moving camera are the most interesting.
It starts with a motorized slider. You don't need anything fancy, I used a cheap GVM slider off eBay. As long as you can make incremental movements with the remote, it will work. I believe every motorized slider can do this in the timelapse mode. Just move it 1 step for every frame. If you are shooting on 2s, you can still shoot your camera movement on 1s for smoother camera movement. I did this by moving the camera every frame, but moving the character every other frame.
Once I animated the shot, I brought it in to blender to track the camera movement. By tracking the movement of a bunch of points, blender can reconstruct the cameras movement so we can match it in our 3d scene.

Then I made some simple trees and projected the texture onto them. Simple geometry usually works fine for background elements like this. They are often out of focus anyway. For more detailed objects I have used photogrammetry before, but let me warn you it can bog down your scene a lot!

The camera solving algorithm will put all those tracking markers into 3d space. By referencing them, we can recreate the ground plane and extend it. They also show us approximately where the real trees are, so we can place the digital ones behind them. Make sure to play back the animation frequently to check that the movement matches. Things may look fine on a single frame, but turn into a confusing optical illusion when they move!

Once we render that out, we can pull it into our compositing software. I'm using Fusion in Davinci Resolve. Don't let my messy nodes scare you. It is not as complicated as it looks.
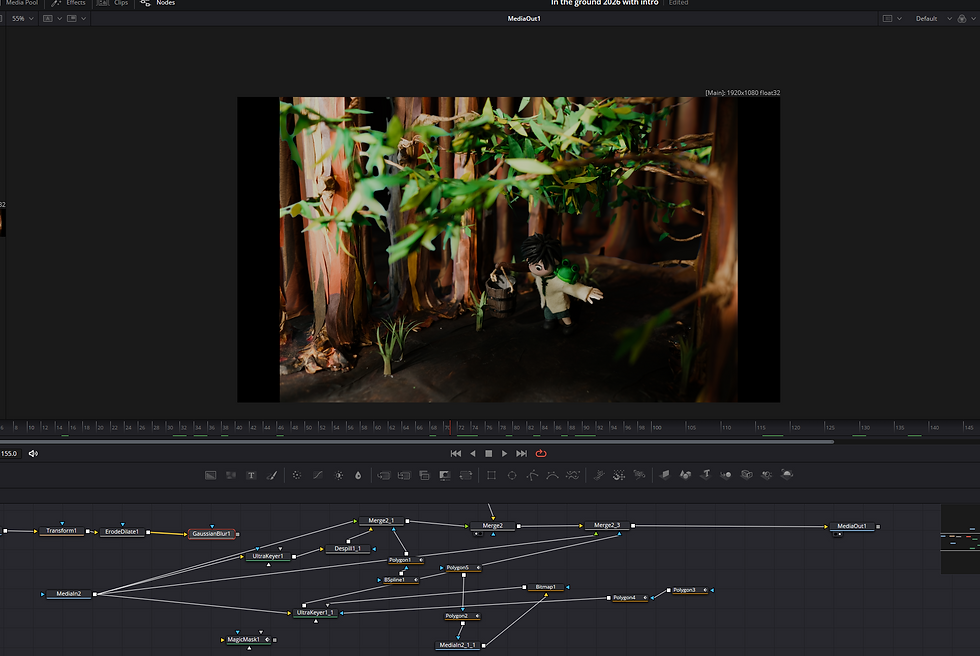
The seams where the real set ends and the digital set begins are usually ugly. The best way I have found to resolve this is the blur the heck out of the transparency in this area.

We could draw a mask here and animate it manually, but an even better solution is to render out a mask from our 3d scene.

Bring that mask into Fusion and use it as a garbage matte. We can slap a dilate node and a gaussian blur on there to tweak it.

This transition looks much better! But oh no! It is cutting into the tree! And we are losing part of the boys head!

No need to fear. We can layer it back onto the frame by creating a mask. Because of the smooth camera movement, this doesn't take too long to rotoscope by hand.

Manually rotoscoping characters is painful and tedious. Sometimes it is the only option, but I recommend trying some AI roto tools. Sometimes Fusion's Magic Mask works, but it can be janky and unreliable. For trickier shots, I use Corridor Key. It takes ages to process and needs a decent gpu, but it gets much better results! (Thank you Corridor Digital for your gift to humanity)
Once you get a clean cutout of your character, you can layer them back on top of the footage and voila! Was this faster or easier than just building a larger set? Lets not think about that too much.
For this shot I 3d scanned the cave wall and mirrored the model to fill in the right side and extend the background.
Watch the whole music video here!
Comments